Tag Archives: potholder

Journal: 12 May 2014

Since my last post, I finished two sewing projects, made another potholder, and made a little bit of progress on my new knitting project. I also did a fair bit of tatting design/drafting, most of which has shown up as pattern posts here, and a bunch of fruitless drafting for another knitting project.

ruffle_detail

Ruffly shirt detail

First, sewing: I finished the blue shirt I mentioned last time. I followed McCall’s M5929 with Mandarin collar and single ruffle options. I ended up having to modify the sleeves on the fly, changing from a banded sleeve to a hemmed sleeve with a pleat, because my arms have gotten a bit chubby in the last year and the bands wouldn’t fit. I was extremely short on fabric—I fit a 3 yard pattern into 2 yards, with the ruffle and plackets cut diagonally—and had thrown out the tiny scraps by the time I noticed this, so I couldn’t go back and extend or cut new bands. I’m reasonably pleased with what I ended up doing, which was to pleat the sleeves at the center of the hem and sew a button over the pleat. I was lucky with the buttons; they’re black with bits of blue in the middle, matching the shade of the fabric well, and I found 9 for a dollar, meaning I could space them closer together on the plackets and still have leftovers. More pictures (click for larger):ruffle_front ruffle_floor2 ruffle_floor

drape_front

Drape-neck shirt

More sewing: This was a ludicrously quick project; I believe it took me only two days including a bit of pattern drafting/alteration, cutting, and seaming and hemming by hand. It also didn’t take much fabric—I had about a yard and a half of this gray flecked stuff hanging around, and it fit the pattern easily. The pattern started as New Look 6483, which is one of my old standbys, and I made considerable alterations. I’ve been thinking about making a knit, drape-neck shell out of my Harlequin colorway sock yarn (teal, green, purple and gold stripes), so I’d already traced the front and sleeve of the pattern onto newsprint, removed the seam allowances, and slashed and extended the neckband and drape_shouldersleeves. drape_neckThe pattern has no main darts, only a bust dart to the side seam, which I flipped into the neckline, and then I put two more slashes from the neckline to the armhole. drape_back
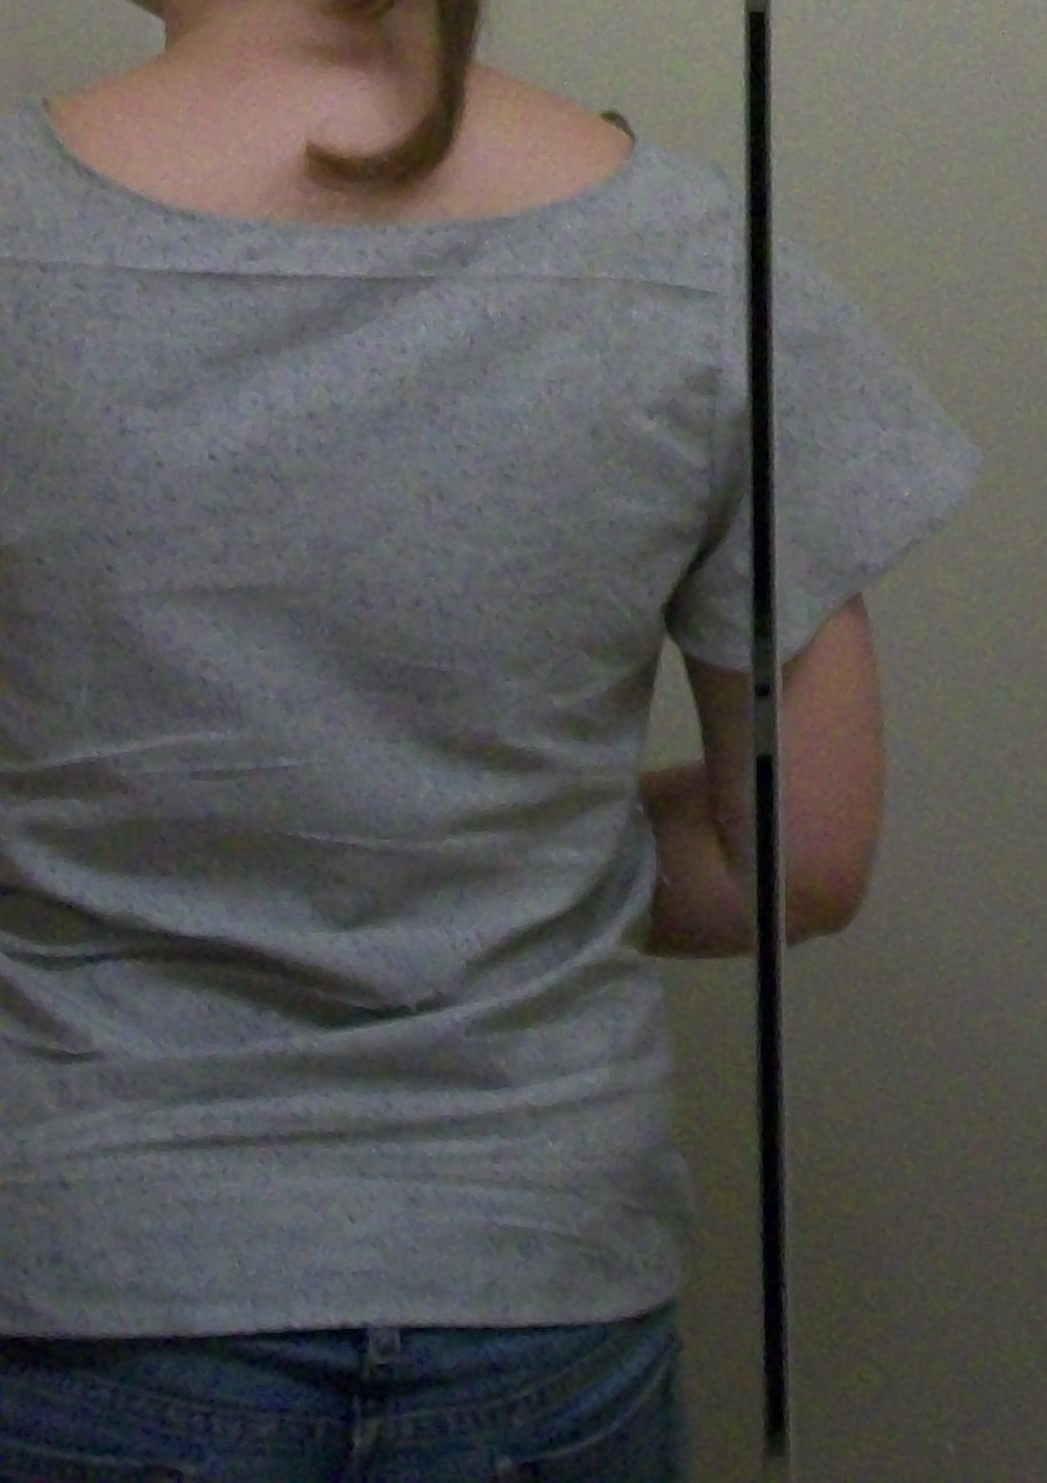
Anyway, when I decided to put the knitting on hold and do a sewing project instead, I taped these pieces to more newsprint, added the seam allowance back in, cut them out, and cut my fabric. Six seams and four hems later, it was done, and I’m pretty pleased—not my favorite shirt ever, and the fabric was not the best choice for drapeyness, but it’s certainly wearable and even a little dare-I-say glamorous.

I’m glad I made this shirt primarily because I spent an entire day just drafting and doing arithmetic for a knit shirt, only to decide my first idea was impossible and my first fallback looked terrible. At least the manual part—tracing the pattern, rearranging the darts and slashing the sleeves—were good for something, as it wasn’t much work to add the seam allowances back on and turn it back into a sewing project. The idea, for the curious, was to attempt a fitted, drape-neck shell worked diagonally. I still think it should work, but I can’t keep everything in my head to work out the details. My first fallback was to switch from knit to crochet, which I’ve been doing longer and thus find easier, but it looked absolutely terrible so I just got disheartened. I think at some point soon I will pull out the drafting and work out a worked-horizontally version, which should be a lot easier, and leave the diagonals for when I am a much better drafter.

potholder_finishedCrochet: I made another square potholder; ’nuff said really, but I have a pretty picture. This one I put a hanging loop on, just because I had some extra yarn left. I enjoy the fact that the colorway lined up to make nearly vertical/horizontal stripes, in a diagonally-worked piece, without my having to put too much effort into making it happen.

Knit shawl: Again, not much to say, but I’ve added a few rows to my new knit shawl project. It’s now got a full repeat of the colorway, so here are some pictures:

surf_1 surf_2

I never thought I’d be a fan of pink mixed in with pale blues and greens, but I think it works quite well in this yarn. I also, while I was at the store for buttons for the blue blouse and some other odds and ends, picked up a skein of the “soft white” color of the same yarn, with which I plan to edge the shawl.


Pattern: Round potholders

Round, two-color, two-layer crochet cotton potholders

Round, two-color, two-layer crochet cotton potholders

Today’s pattern is an easy crochet potholder. As I mentioned in my last journal post, I recently got a big bag of cotton yarn with the intent of making assorted homeware out of it, and started immediately on square_potholderspotholders, following a pattern that one of the folks at a local needlework club showed me. The pattern is quite clever, but doesn’t really belong to me; anyway, it makes double-layer squares on the diagonal, shown at right. I made four before getting a little tired of doing the same thing; instead of just putting the overall project to the side, I decided to work out a similar pattern, with a double-layer and easy color changes, but in a different shape. What could be easier, I thought, than a circle?

potholder_redside

You can see that it wants to wave, even after significant prodding to lay flat

I’m posting this primarily to save y’all the trouble of finding out. Those of you who have done much crochet will know that circles that neither wave out or crimp up into bowls are actually a pain (as, indeed, I knew going into this, or at least should have known). I’d done some granny squares recently that started with 18 tc on a magic ring, with successive rows of (basically) dc adding 18 dc in every ring, so I thought this would be a good starting point. Unfortunately, this sucker started waving wildly (made a noticeably hyperbolic surface) at about the fourth row, so I ripped it out and tried with 16 as the magic number. Much better—this time it didn’t start waving much until about row 6, and could be made to lie flat with some effort, so I could not be bothered to rip it out. My next one, I started with 15 tc, but it was still a little wavy, so my third and final one, which actually lies flat without effort, starts with 14 tc.

cotton_yarnYou will need two different, coordinating colors of a worsted-weight cotton yarn, one ounce/46 yards (28 g/42 m) each, and a G6/4mm hook (or, size down one from the hook recommended on the yarn sleeve). This will make an 8.5″ (21 cm) diameter circle, or close to it.

You will need to know dc (double crochet), tc (treble/triple crochet), sc (single crochet), slip stitch, chain, and magic ring; if you don’t know magic ring, there are lots of tutorials around including one I made in the first steps of this pattern: granny_slippers.

Pattern:

  1. With one of your yarns (yarn A), magic ring, chain 4, and make 13 tc (chain acts as 14th tc), slip stitch into top of chain 4
  2. Chain 3, dc in same top of chain 4, 2dc in each of next 13 ts, slip stitch into top of chain 3
  3. Chain 3, dc in same top of chain 3, (dc in next dc, 2dc in next dc) around, dc in remaining dc, slip to close
  4. Chain 3, dc in next dc, (2 dc in next dc, dc in next two dc) around, 2dc in next dc, slip to close
  5. Set this piece (piece A) aside and repeat from step 1 with the other yarn (yarn B, making piece B)
  6. Tie the two pieces together at their centers using the tails of the magic loops, making sure the right sides (the side facing you as you work) are facing outwards
  7. Rotate the two pieces so that the loose ends of yarn are at the same place; slip stitch yarn A into piece B in the last dc you made, and slip stitch yarn B into piece A in the last dc you made on that piece
  8. With piece B facing you, chain 3 in yarn A, dc in top of chain 3, (2dc in next dc, dc in next 3 dc) around, 2dc in next dc, dc in next dc, slip to close
  9. Still with yarn A in piece B, chain 3, dc in same top of chain 3, (dc in next 4 dc, 2dc in next dc) around, dc in next 4dc, slip to close
  10. Repeat steps 8&9 with yarn B in piece A
  11. Slip yarn A back into piece A and yarn B back into piece B, lining up the pieces however they want to lie
  12. With yarn A on piece A, chain 3, dc in next 4 dc (counting the chain-3 as a dc), (2dc in next dc, dc in next 5 dc) around, 2dc in remaining dc, and slip to close
  13. Repeat step 12 with yarn B on piece B
  14. Decide which yarn(s) to make your binding with—whichever one is longer is a good choice, or you can use both, or a third color of yarn if that’s how you roll. At any rate, with one yarn, chain one and sc around, catching the top loops of the next dc on both piece A and piece B into one stitch. If you are using both yarns, sc halfway around the circle with one, then go back and do the other half with the other, turning the other piece to face you.
potholder_detail

Detail of the 14-stitch potholder

Note: At a higher level of abstraction, this pattern is just a set of rows, each of which is 14 stitches longer than the row before it; the increases are evenly spaced, and line up between (not on top of) the increases in the previous row. If you can’t see the forest for the individual stitches, just keep that in mind and you’ll be fine.

Note the second: While you work on it this potholder will be a bit wibbledy—at first it will try to form a bowl, and later it will try to form waves in the outer edge. It does come together as you bind it with the last row and lies quite flat when finished. If it’s too wibbledy as you work, though, and you’re getting nervous, I won’t be offended if you rip it out and try a different number of stitches; 13 or 15 may work better with your individual crafting idiom.

Note the third: The potholder is two layers primarily so that it will provide better protection—crochet stitches leave fairly large gaps in the fabric, which the second layer will fill. The pattern will also work for a single-layer circle, if that’s something you want, but don’t use it as a potholder. Also, don’t use synthetic fibers for potholders, as they melt—usually I am all for changing up yarns, but cotton is what you want for kitchenware as it cleans better than wool and handles heat better than synthetic.

front_backNote the fourth: The two sides of the potholder will both be equally presentable, depending on your yarn choices; note that the two potholders in the image at right are made the same in terms of colors, and I have put one facing “up” and the other “down” to show both sides.

Note the fifth and final: You can also use these as trivets/coasters, dishcloths, etc., although as with anything I make by hand I would be careful not to use them on anything that will stain.