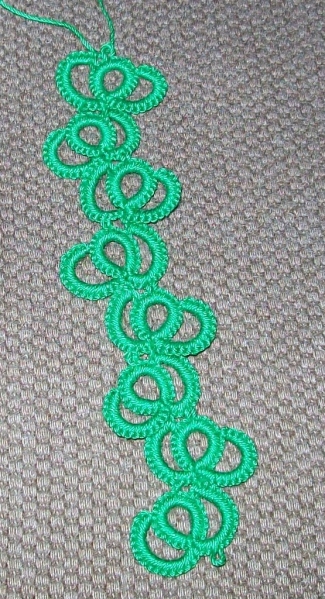
So I mentioned a while ago that I haven’t really been feeling like tatting lately, and that hasn’t actually changed. However, I recently flew cross-country (for a job interview, wish me luck!) and to my mind there are very few better things to do on a plane than tatting. I brought my little kit and some odds and ends of thread and ended up designing two patterns and having a nice conversation about historical crafts with my seatmates.
I’m not sure this one quite works as an edging, which I think of as being used horizontal, but I rather like it vertically. I’m also not sure it would remind me of a cactus at all if I hadn’t happened to make it in green thread.
Fair warning: this pattern is a giant pain to make more than a short piece of. You have to unthread and rethread the needle once per motif. Consider yourself warned.
The reason that this pattern is a giant pain is I was experimenting more with chains to nowhere—chains made on the needle thread, working towards the eye of the needle. For this pattern I figured out how to attach the loose end to the next object one makes, which I’ll describe in detail in the instructions.
One final caveat: this pattern, like all my patterns, is designed for needle tatting; unlike most of my patterns, I don’t know how to easily translate it to shuttle tatting or if it’s even possible.
The chains to nowhere, in addition to being annoying to make, make it a little tricky to figure out where all the threads go, so after the instructions I’ve posted a set of photos of making a motif on a short piece of rainbow-colored thread. Refer to those if you get lost (or like rainbows). Without further ado:
- Without threading the needle, hold the needle flipped opposite of how you usually hold it—the point should be down by your palm and the eye out in space. Work your knots from the center towards the eye of the needle.
- Using the needle thread, chain 16ds. Thread the needle with the end of the needle thread. Start to pull it through (pull the stitches off the needle onto the needle thread). Pass the needle through the loop you are making in the needle thread (as if to make a SCMR; see tutorial here). Finish tightening up the chain, but don’t tighten up the loop—leave a couple feet of thread running from one end of this chain to the other.
- Working in this reserved couple feet of thread, make 8ds on the needle, with the needle still threaded and pointing in the usual direction. This is the beginning of a ring.
- Grip the loose end of the chain-to-nowhere and pull on the needle thread (as gently as you can), taking up the slack in the reserved thread and bringing the loose end of the chain-to-nowhere up to the needle. I’ve talked about my “reverse joins” before; this is basically that.
- Finish the ring: make 5ds, picot A, 3ds, small picot B, 8ds, and close the ring.
- Chain 3ds, join to picot A of the previous motif, 13ds.
- Pass the needle through picot B of the current motif and tie a shoelace knot (AKA half of a square knot, etc).
- Pull the thread off the needle and repeat from step 1.
Photos (as usual, click for larger images):


The ‘chains to nowhere’ are called Floating Chains or Thrown Chains or Thrown Off Chains or in an old book they are called Dead End Chains. They have been around for decades. I love making things with them. 🙂 Isn’t it fun discovering things you don’t know? Have a great day!
LikeLike
Ah cool, thanks!
LikeLike