
Woe and tragedy!
Recently, my favorite tote bag, which had faithfully carried weekly groceries for several years, sprouted a hole. Unlike many previous holes, which I patched, this one was right beneath a handle, making it both more difficult to work on and more likely to fail again. It is time to replace it, but this bag was special–unlike most tote bags and reusable shopping bags on the market, its handles are long enough to make shouldering the bag easy, and I liked the relatively deep shape. Thus, an excuse for crafting emerges.
- Get a half-yard per bag of canvas, duck, denim, or another hard-wearing fabric. You only need 44″ wide, although most heavy fabrics come in 60″ width anyway. I am making two bags, so I have one yard.
- Either buy webbing for handles, or make handles out of excess fabric (instructions below). You need two lengths of 30-36″, depending on your arm length, and somewhere between 1″ and 2″ wide. Since everything is measured in yards, I just got two yards of 1.25″ cotton webbing for one bag and used some of the excess 36″x16″ from cutting my yard of 60″ fabric down to 44″ to make handles for the other.
- Cut your fabric down to 18″x44″ if necessary and fold in half to make it 18″x22″; the fold will be the bottom of the bag. Sew up the sides with a 5/8″ seam allowance, using a fairly heavy-duty thread (normal quilting thread is fine, as long as you can’t pull it apart in your hands) and backstitching liberally to reinforce the seam.
- Create a flat bottom for the bag by sewing
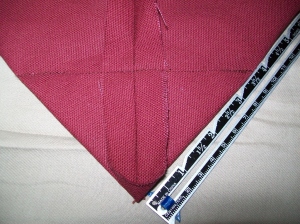 up the corners: press the side seam open for the bottom 6″ or so and flatten the corner with the side seam centered against the bottom fold. Mark 3.5″ from the corner on both sides and use a straightedge and pins or chalk to mark a straight line across the corner. Sew along this line. Repeat on the other side. This creates a 5″x18″ flat bottom, suitable for quarts and 2L bottles; if you buy a lot of gallon jugs you may want to increase this to marking 4.5″ from the corners for a 6.5″ bottom.
 - Hem the upper edge: give it a generous 3/4″-1″ hem and sew twice around it, close to the bottom and top edges of the hem. Press the side seams to one side at the hemline, not open.
- Place the handles: mark 4.5″ on either side of each side seam (four marks, two on each panel). Fold 1″ of each end of each handle back against the handle and pin. Place one handle end on the inside of the bag, such that the side closest to t
 he side seam is at the 4.5″ mark and the 1″ fold is below the hem, and pin in place. Place the other end of this handle in the same way on the same panel, being careful not to twist it, and place the other handle on the two marks on the other panel.
 - Test fit: grab the center of both handles in one hand, bend your elbow, and see if you can pass your elbow freely through the handles and deposit the bag on your shoulder without involving your other hand at all. If not, reduce the below-the-hem fold in the handles, or get longer handle pieces.
- Sew down the handles thoroughly–I sewed a box close to the edge of the handle/bag overlap area all the way around, then sewed another box 1/4″ inside the first box, then sewed an X across the inner box. These handles aren’t going anywhere.


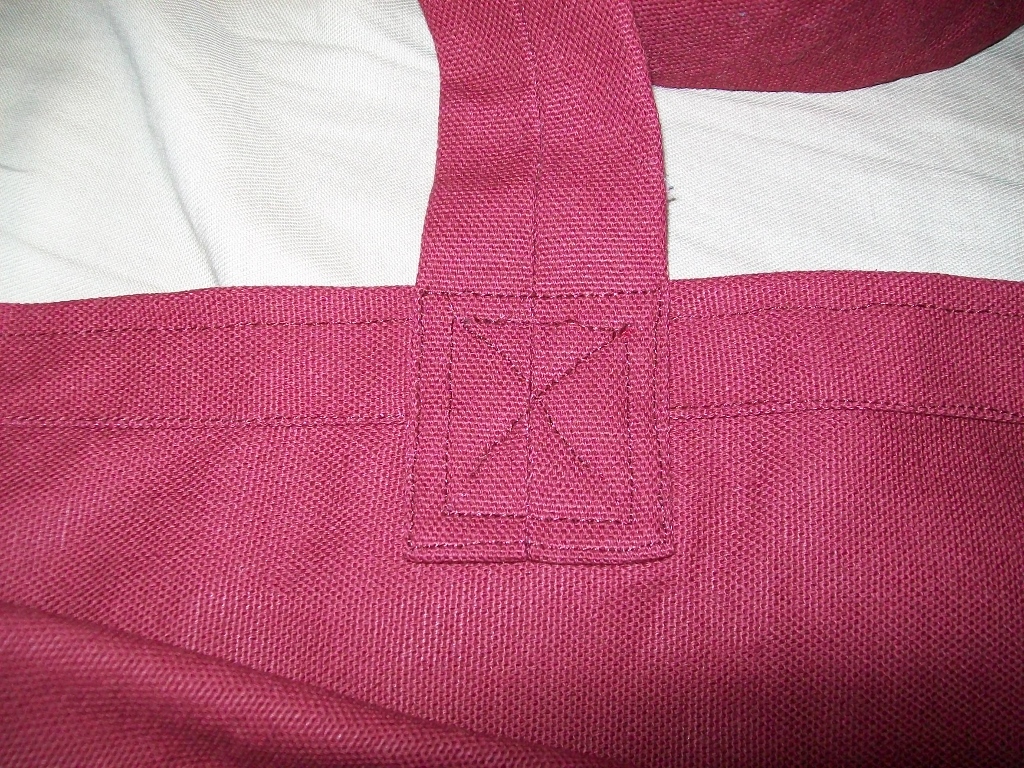
Detail of handle attachment to hem

Handle placement
How to make handles: get two strips of fabric, 4.5″ by at least 30″; 36″ is better and usually convenient. Fold in half along the length and sew a 3/4″ seam. This gives a 1.5″ handle; for 1″ handles use 3″ strips and a 1/2″ seam, or for 2″ handles use 6″ strips and a 1″ seam. Press the seam open (you can do this just by pinching; I don’t even own an iron) and flatten the handle such that the open seam is in the center of the flat area, making the whole width of the handle 3 layers of fabric thick. Being careful to preserve the open seam, turn the handle inside-out, and flatten again with the seam centered. Two strategies for turning handles: 1) fold the fabric at one end inwards, and gradually push additional fabric into the end of the tube until you can grab it at the far end and pull it out, or 2) attach some sturdy string or floss to one end on a large tapestry needle, pass the needle through the tube, fold in the fabric at the end, and use the string to pull the fabric through.
If you are trying to make long enough handles from two shorter rectangles of fabric, DON’T sew them together straight across the end with a standard seam. Graft them diagonally by laying them overlapping in an L shape, and sew from corner to corner of the overlapping area (top-left to bottom right of the square at the corner of the L), and trim the corners to 1/2″ or so.
If you’d rather buy handles, you can find webbing amongst the notions, usually near the velcro and heavy fasteners, the boning and elastic, or the by-the-yard ribbon and lace edgings. I recommend getting cotton rather than the stiff synthetics because a) it feels better and b) I imagine you need a pretty heavy-duty sewing machine to punch through the synthetics.
Final note: although I do almost all of my sewing by hand these days, I pulled out the machine for this one, and definitely do not recommend doing it by hand.

Finished!

Pingback: Journal: New sewing machine edition | seesawyer
Pingback: Journal: 7 June 2014 | seesawyer
Pingback: Journal: 21 February 2014 | seesawyer